Have you ever received an edited document from someone but they didn’t track their changes, so you can’t easily see what is different from the original? Or maybe you have multiple people working on a complex document and you want to see what has changed from one iteration to the next, through the development process. In Word this is a great feature that allows you to compare 2 versions of a document that automatically red-lines the changes so you can view each edit or difference between the 2.
You can compare two documents regardless of how you are storing them or identifying the different versions. For example, 1) if you are saving your documents in OneDrive or SharePoint, and it is automatically saving revisions as different versions stacked on top of each other, or 2) if you are saving them on your computer or a shared company server, where you are naming them as v.1, v.2, etc., to designate a different version, but they are really different documents.
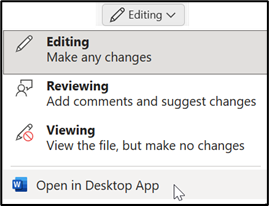
If you are viewing your document online in a web window, you will first need to Open it in the Word Desktop App, since the compare feature is not an available command in the web version or Word. If you are viewing the document already in the Word App on your computer, you can skip to step 3 below:

- In the upper right-hand corner above the Ribbon, click on the Editing button
- Then select Open in the Desktop App from the bottom of the menu

- Now that your document is opened in Word on your computer in the Desktop App version you can start the compare function
- Go to the Review tab on the Ribbon, and click the Compare button
- From this menu you will have many options depending on how your Word versions are created and stored.
- If your document is stored in OneDrive or SharePoint with automatic versioning turned on, you can select one of the first 3 options on the menu to either compare your current opened document to the last Major Version, the Last Version or a Specific Version that you select.
- If you are selecting a document that was manually saved as a different document either on your computer or company server or even in SharePoint or OneDrive, you want to use the Compare option – which allows you to pick the document.
- If you select this option, you will see this additional dialog box where you will need to select the 2 documents you want to compare by clicking on the small yellow folder button and navigating to and selecting each document
- Then click OK to get the red-lined compared document
- If you are selecting a document that was manually saved as a different document either on your computer or company server or even in SharePoint or OneDrive, you want to use the Compare option – which allows you to pick the document.
- The final Combine option on the menu is good if you are trying to merge multiple documents into one single document with all of the different edits combined.
- If your document is stored in OneDrive or SharePoint with automatic versioning turned on, you can select one of the first 3 options on the menu to either compare your current opened document to the last Major Version, the Last Version or a Specific Version that you select.

- Once you have selected each of the document versions, you will see a red-lined document that displays a new combined red-lined version in the middle, a panel on the left of each revision, and the 2 different versions on the right hand side
- These windows all have synchronous scrolling so you can easily move up and down withing the documents to view all changes.
- Optional: You can also use the Word Track changes feature to Accept or Reject each change if you want. Then you can save the final version as a brand new document or version.


