The light gray Excel gridlines are a normal part of Excel workbooks when opening a new blank workbook. For some, these gridlines are annoying. Unfortunately, there are no default settings for eliminating gridlines in new workbooks. However, there are a couple of different ways to alter gridlines once you have opened a new workbook or are editing an existing workbook.
Using the “Gridlines” command:
This is the quickest way to remove gridlines, without having to go into the settings area, to turn off the gridlines for the active worksheet only.
- Click the Gridlines radio box to remove the check mark, located on the View tab in the Show
 Setup a Personal Template:If you want a workbook to open with one or more gridline exempt worksheets, then a template needs to be built, ensuring worksheets do not have gridlines, and requires intentional updating to overwrite the template.
- Open a new blank workbook in Excel.
- Create the number of worksheets you want created within the workbook when using the template, by clicking the plus icon next to the worksheet tabs at the bottom.

- Remove the gridlines from each worksheet, using the step earlier in this post.
- Click the File tab, then Save As.
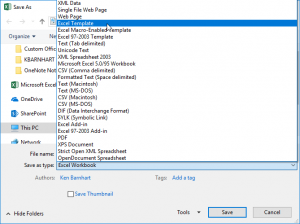
- Click Browse, so the Save As dialog box opens, then select Excel Template from the Save as Type:dropdown list.

(By default, this will save your template in the Personal section, when creating a new workbook.)
- Give your new template a name, like Blank with No Gridlines and click Save.
- Close your new template, so there are no conflicts.
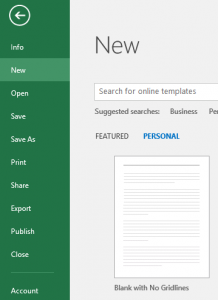
- Next time you open Excel, click New under the File tab, then select Personal and your new template will appear.

For more ways to make Excel work for you, take a training course from AdvantEdge Training & Consulting!


