Excel has tools for complex, or multilayered sorts that involve several columns or headers. There are 2 ways to create a complex sort in Excel.
Method 1 – The Sort button
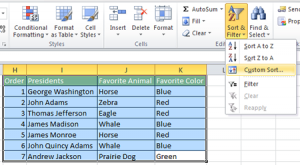
 Select the all of the data in the table you need to sort. Under the Home tab, click on Sort & Filter in the Editing Group. Then choose Custom Sort (this feature can also be accessed with the Sort button under the Data tab in the Sort and Filter group). A dialog box will pop up.
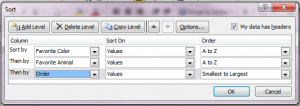
Check or uncheck the My Data has Headers box, depending on your data. Then change Sort by to the column that has the data that should be sorted first. Use the Add Level button to add other criteria to the sort. You can position the order of sorting with the up and down arrows.
In this example, the data will first be sorted by Favorite Color, then by Favorite Animal, then by Order.
Method 2 – Using Filters to Sort
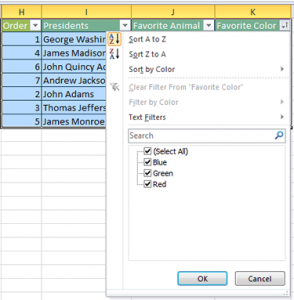
The other way to create a complex sort, meaning sorting by multiple columns, is to use the filter tool. Select your data. Then, under the Data tab, toggle on Filter under the Sort and Filter group. Drop down arrows will appear in each of your columns.
 These drop down arrows offer a few different tools. You can filter the rows by value or color, and you can also sort alphabetically or sequentially either direction.
Use the sorting tools in order to organize your data the way that you need it to be organized, sorting and resorting the data in the appropriate order.
Saving Custom Sorting in Excel
After programming a complex sort in Excel, it is often helpful to save that sort to use again on the same table. You should be able to do this automatically as the sort settings are saved with the document. Simple select the exact same cells and click on the sort button again. If your saved sort isn’t offered, try selecting the entire worksheet with Control + A, and then clicking on the sort button.


